
How To Host Your Site on Gitlab Pages for Free ?
Table of Contents
- What is GitLab Pages, and Why Does it Matter ?
- How To Host Your Site on GitLab Pages For Free ?
- Step 0 : Prerequisites
- Step 1 : Create a GitLab Project for Your Static Site
- Step 2 : Add a Custom Domain Name
- Step 3 : Edit Your Domain's DNS Records
- Step 4 : Verify Your Domain's Ownership
- Step 5 : Generate an Access Token
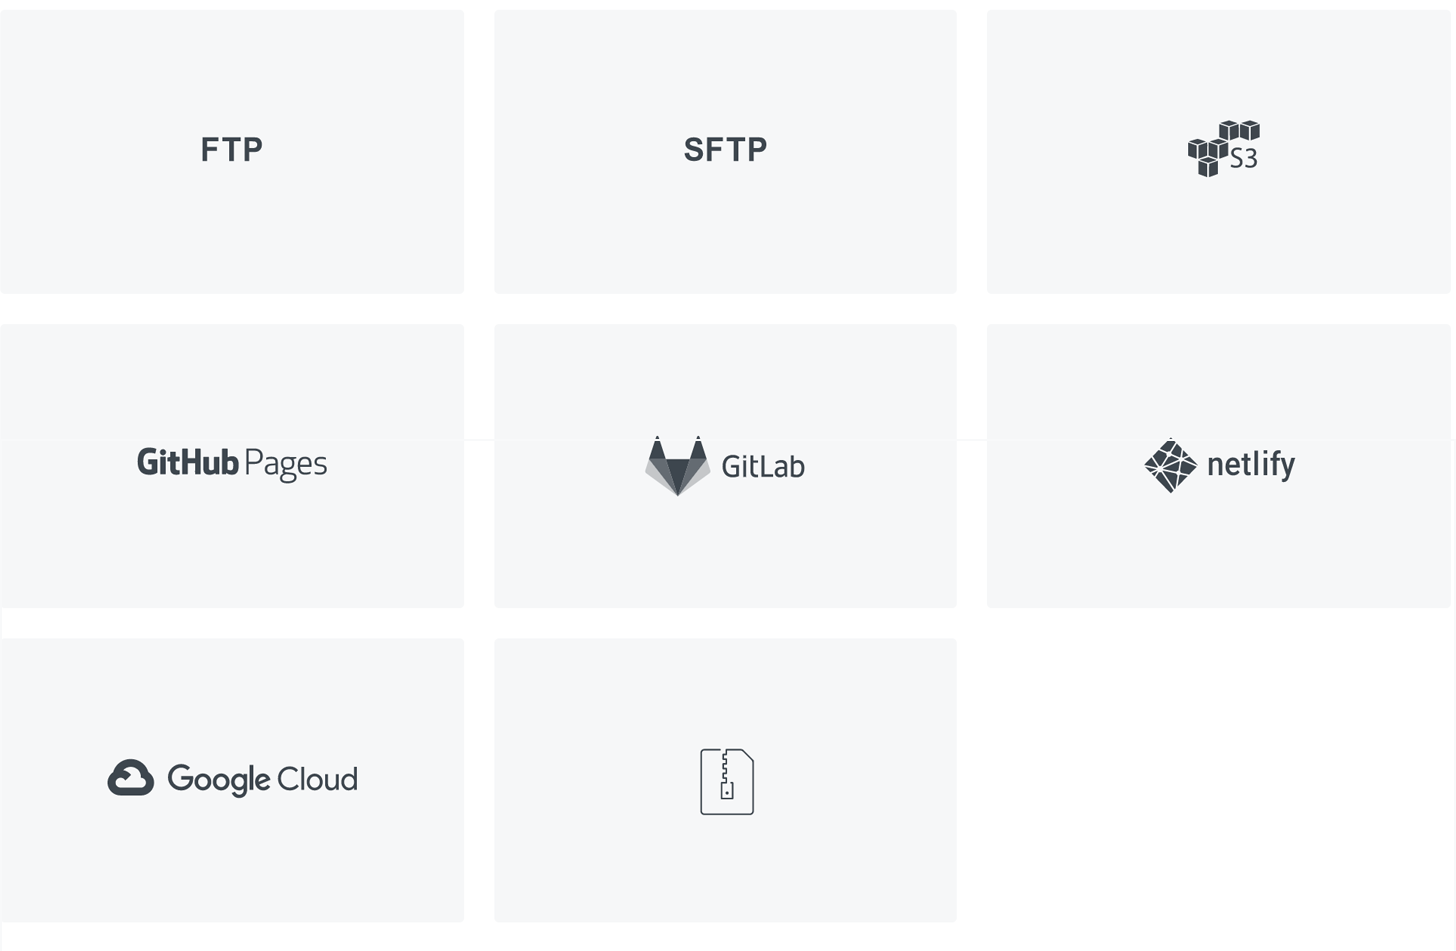
- Step 6 : Set Up GitLab Pages as The Server in Publii
- Step 7 : Put Your Site Online
- Tips and Reminders
- Wrapping Up
- Sources & Credits
So you want to host your site for free ? And you choose GitLab Pages for that.
If you read our post describing GitLab Pages, you're already aware of most of the features of this free hosting provider.
However, in case you didn't, just keep in mind that GitLab Pages is a platform that allows you to host your static site for free.
It also provides you with many important features for an unlimited number of websites at no cost.
This is really an option worth considering and if you feel like checking it out, be sure to read the post describing it in detail.
Today's post is rather about how to get the most out of GitLab Pages.
It doesn't assume any previous experience building websites or using GitLab, the platform supporting GitLab Pages.
Thus, I chose the easiest tools I know so that you can follow along no matter your technical level.
I choose Publii CMS as it's the easiest to my knowledge. Feel free to use any alternative you prefer.
If you know an easier alternative, please let me know in the comments or contact me directly. Thanks in advance.
That said, let's get started.
What is GitLab Pages, and Why Does it Matter ?
As I said at the beginning of this post, GitLab Pages is a free static hosting provider.
In other words, it allows you to host a website only made of static files (HTML, CSS, JS) without spending a dime.
Why bother hosting a static site, on GitLab Pages ?
First, GitLab Pages is free.
At first, it's not a big deal, right ?
There are many free hosting providers out there.
So, you may think that this isn't really a unique selling point.
But, here's something you're missing.
Not all free tiers are created equal.
Beside being free, GitLab Pages comes loaded with many awesome features :
- free SSL security certificates for prefixing your site's URLs with HTTPS;
- unlimited bandwidth;
- unlimited number of sites;
- 10 GB storage per site;
among other perks.
Static sites, on the other hand, can run properly with very low requirements on top of being inherently fast and secure.
When you combine the features of GitLab Pages with the qualities of static sites, you get a secure and blazing fast site that you can run with very minimal effort, completely free.
How many hosting providers can beat that ?
Think about it for a moment.
By now, you surely want to learn how to host your site on Gitlab Pages for free.
So, here's how to do it.
How To Host Your Site on GitLab Pages For Free ?
The steps of today's tutorial can be divided in three big parts.
In the first one, you'll set up everything you need to truly get started. This part consists of the prerequisites step (Step 0).
The second one describes the steps that take place on GitLab. This part ranges from the step 1 to the step 5.
The last part deals with what you need to do in Publii to put your site online.
By the end of this tutorial, you'll have your website hosted on GitLab Pages under a custom domain name for free.
Step 0 : Prerequisites
Before getting to the actual steps for hosting your site on GitLab Pages, you need to :
1 - Create a GitLab Account
To be able to host your site on GitLab Pages, you need an account on GitLab, the platform providing the hosting service.
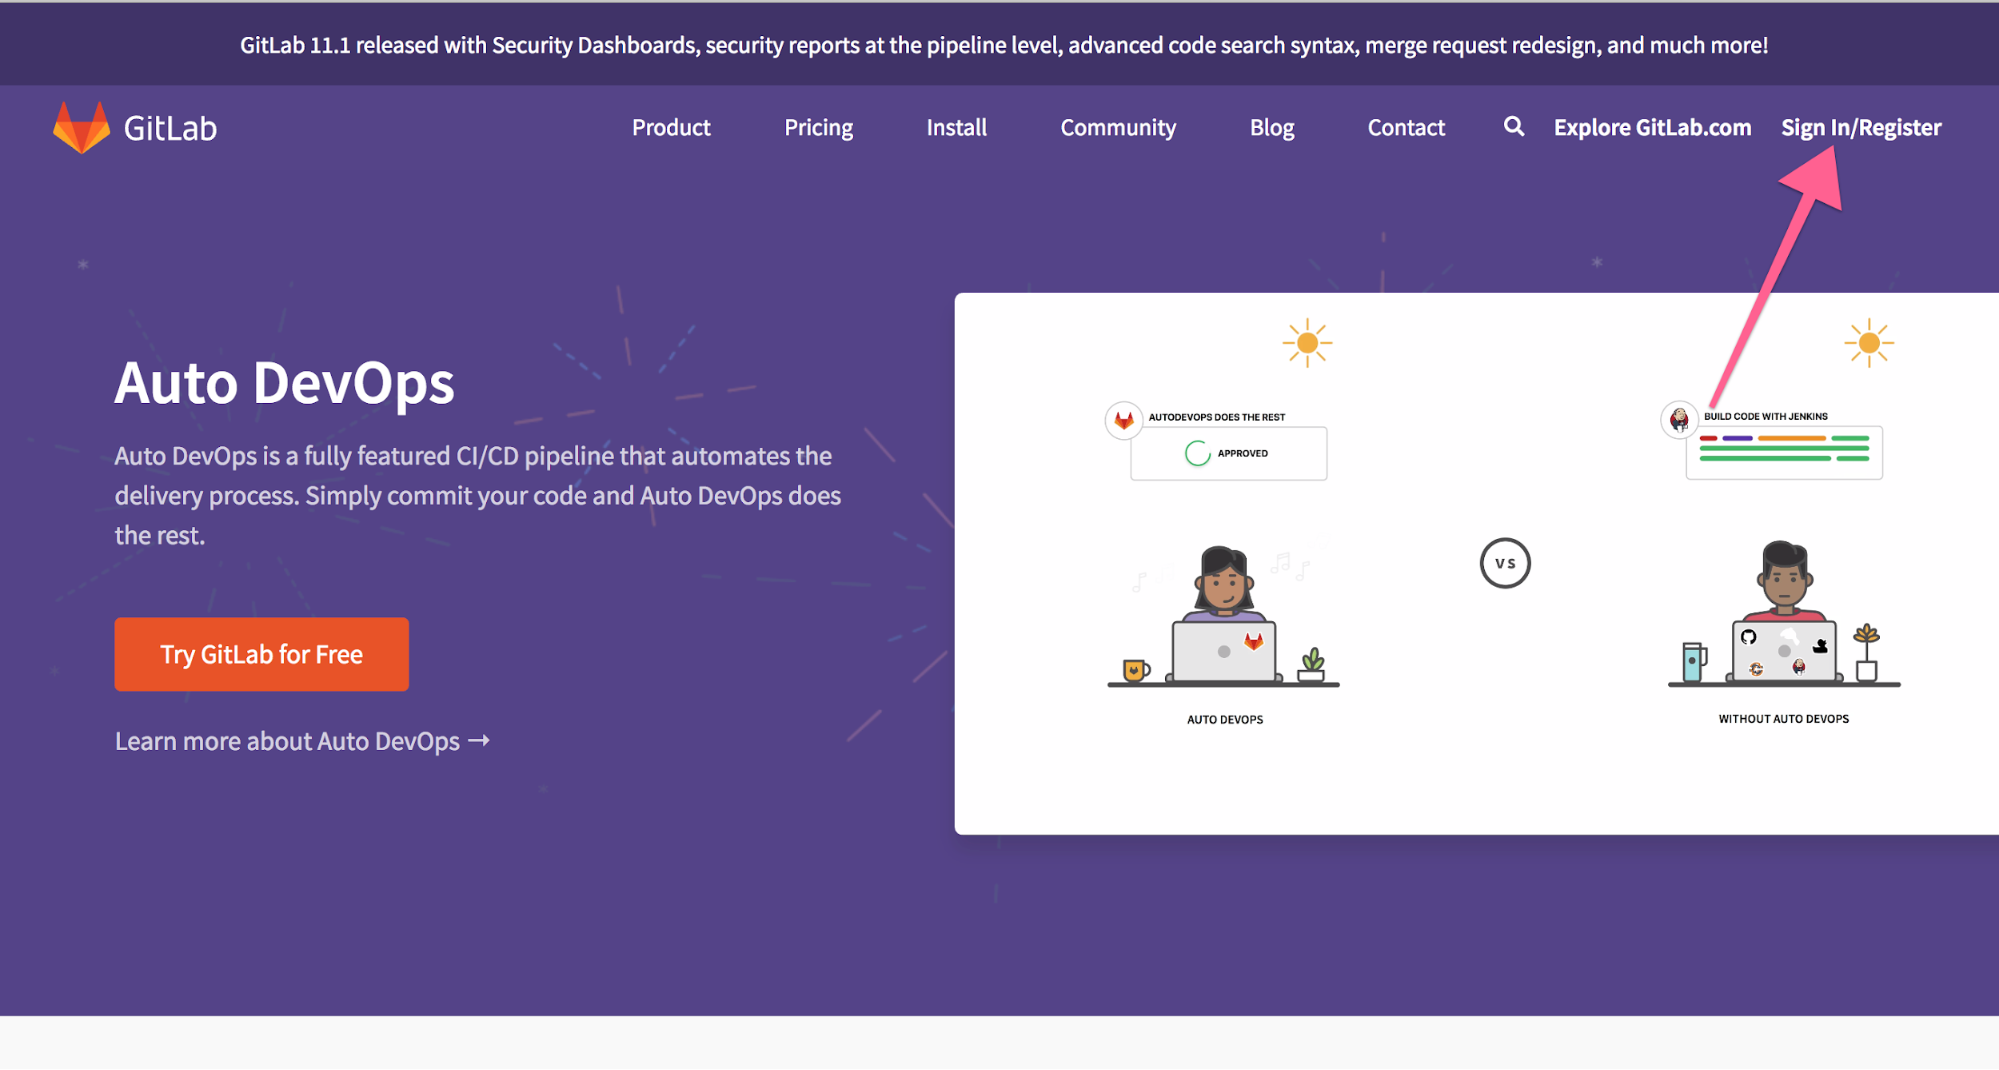
Start by going to GitLab's website located at gitlab.com.
Once there, click on the registration link in the top right corner.
You'll be taken to the registration page, where you'll be given two options :
- register using your email and a password;
- using an existing account from platforms like Google or GitHub.
Choose one, follow the process and, you'll be done in a few minutes.
Of course, just sign in if you already have a GitLab account.
2 - Download and Install the Publii CMS on Your Computer
After creating your GitLab Pages account, download the Publii CMS at getpublii.com/download .
Download the Publii setup by choosing among the macOS, Linux, or Windows version.
Now run the Publii installer according to your operating system.
On Windows, double-click on the .exe file and complete the installation process.
3 - Create the Site You Want to Host Using the Publii CMS
Launch the Publii CMS by running the desktop application according to your operating system.
You'll be prompted to create a new website on the following screen :

Enter your website's name and the name of its main author.
From that point on, feel free to create the pages and the posts you want.
For more details on the Publii CMS, see the post describing the Publii CMS in depth.
Step 1 : Create a GitLab Project for Your Static Site
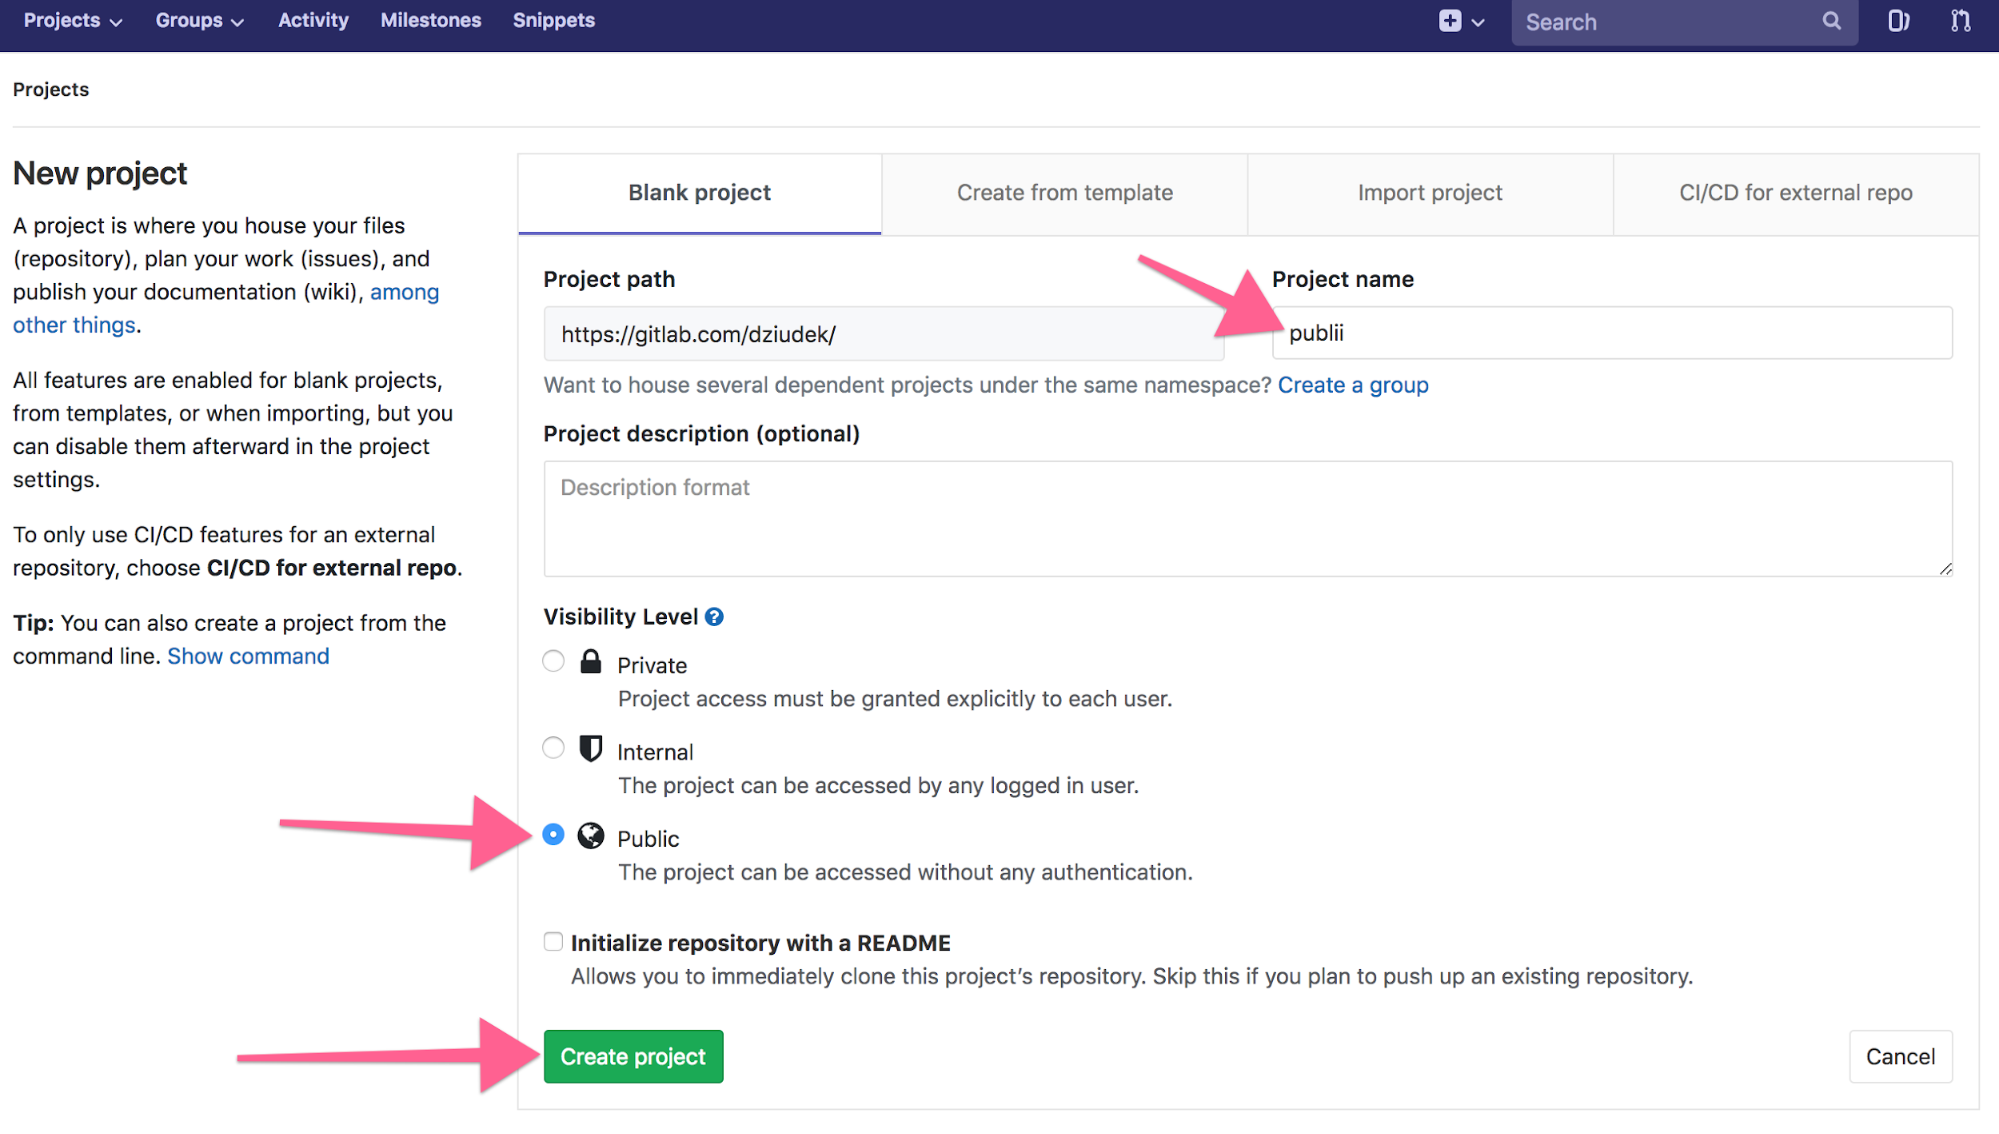
Now that you're done with the prerequisites, go back to GitLab and create a repository for storing your site's files.
On your dashboard, click on the dropdown in the upper right corner.

You will be taken to the following screen.
Start by entering the name of your project.
The project path is normally provided and filled in for you.
If it's not, just append your username to the base GitLab URL (https://gitlab.com/{{username}}) as you can see in the screenshot below.
Then set your project's visibility to Public and finally create the project by clicking on the green button.
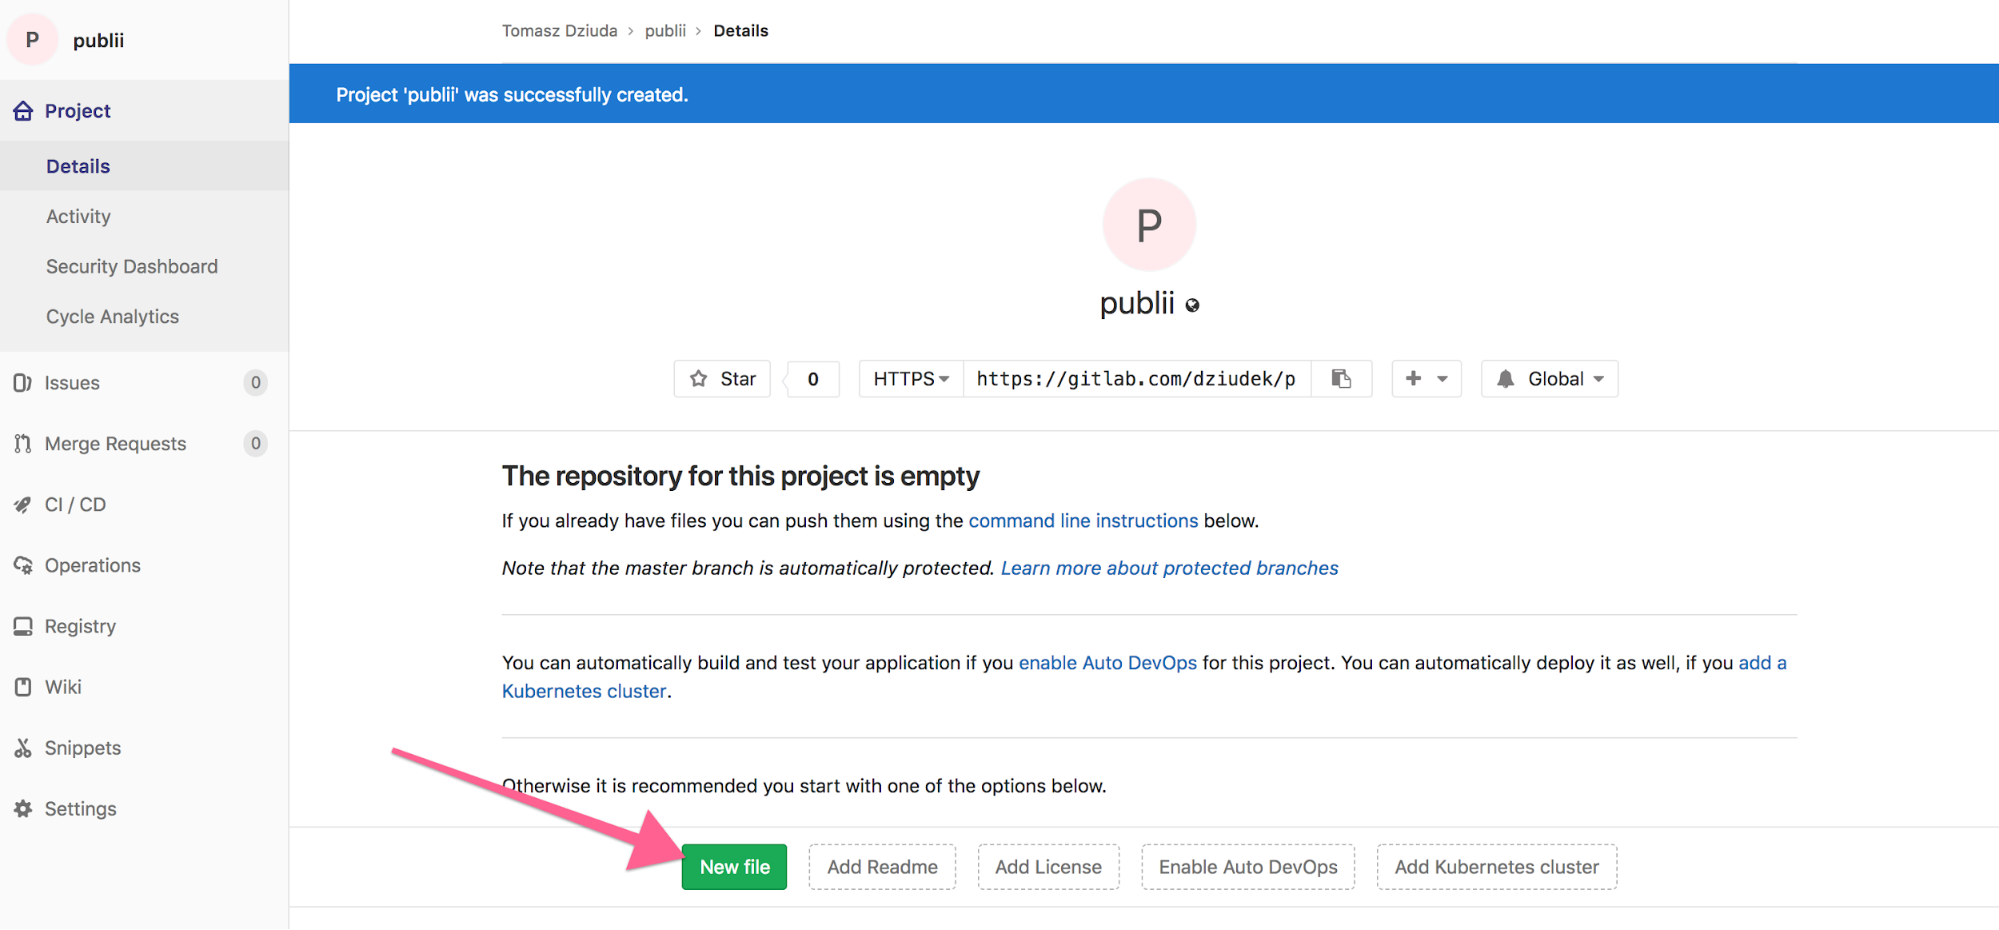
By now, your new repository is empty.
Hit the "New file" button to add a file.
Provide ".gitlab-ci.yml" as the name of the new file and add the following content :
image: alpine:latest
pages:
  stage: deploy
  script:
  - echo 'Nothing to do...'
  artifacts:
    paths:
    - public/
  only:
  - master
You'll get something like this :
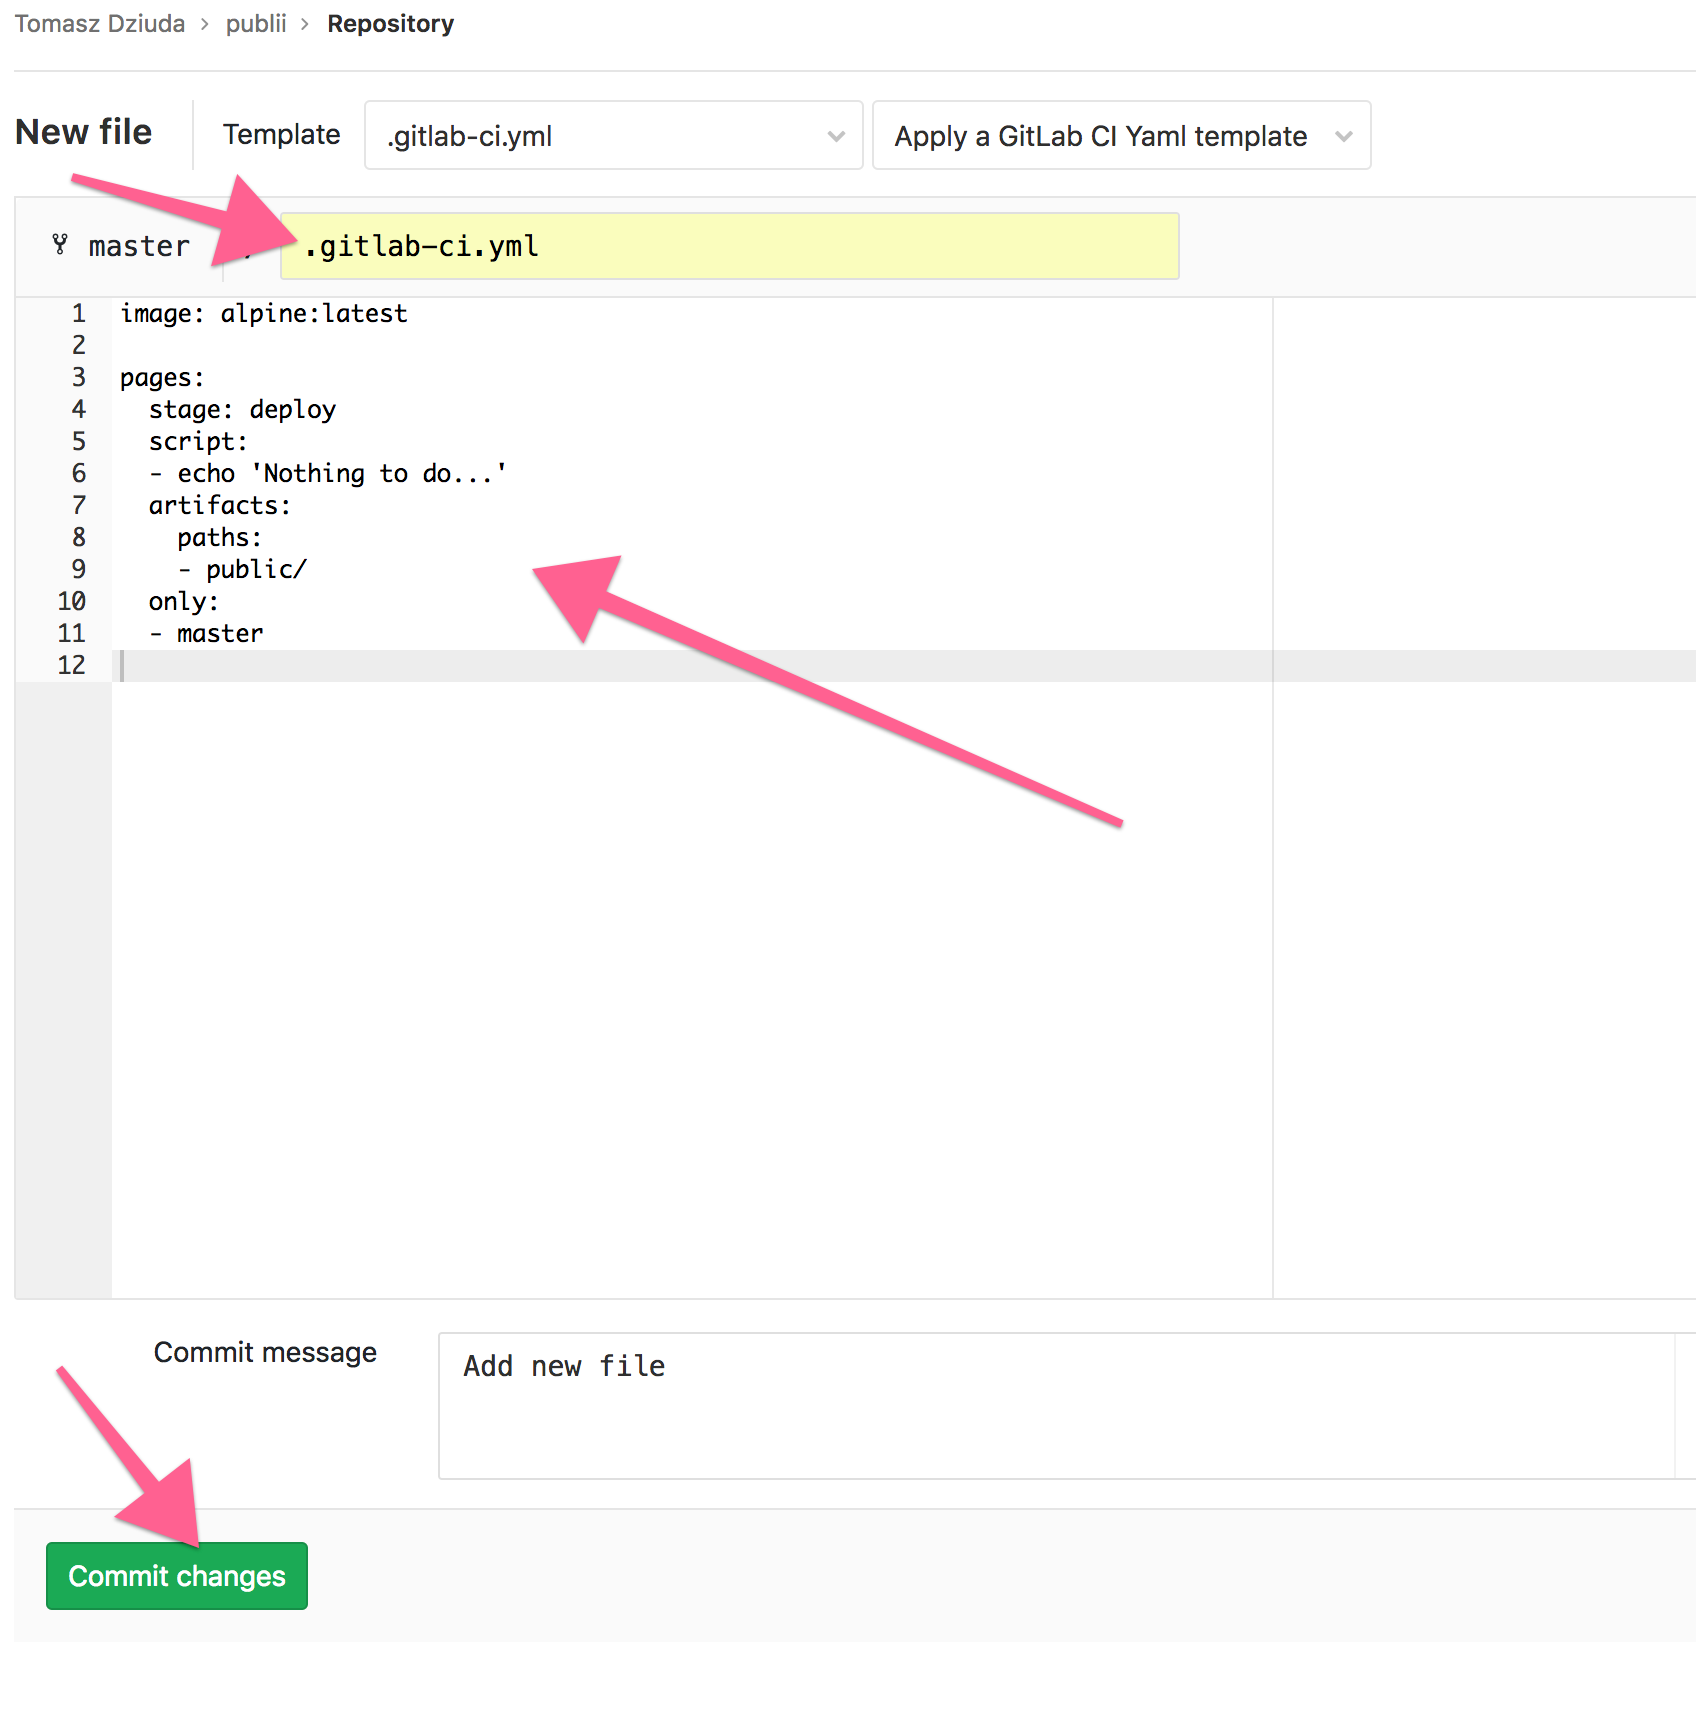
Save the content of your .gitlab-ci.yml file by hitting the "Commit changes" button.
Step 2 : Add a Custom Domain Name
You have many options when it comes to adding a custom domain to your site hosted on GitLab Pages.
You can assign either a root domain like mysite.com or a subdomain like subdomain.mysite.com.
The www prefix in www.google.com is an example of subdomain.
Now, you may be wondering if you should go for a root domain or a subdomain.
Simply put, you can do whatever you want ...
... but, every option has its set of pros and cons.
I recommend you, based on my experience :
- to assign a www subdomain (www.example.com) to your site first;
- then, to point your root domain (example.com) to your previously setup www subdomain.
This setup allows your visitors to get to your site by typing the shortest option (example.com instead of www.example.com).
Furthermore, choosing a www subdomain as your site's primary address gives you more flexibility in adding new services under your root domain.
Adding MX records for a given mail server, for instance, can be slightly more complicated if you were to host your site directly under your root domain.
Feel free to learn more on that subject later on, as there is a lot to learn.
For now, as I suggested earlier, start by hosting your site under the www subdomain first, then redirect the root domain to that subdomain.
So let me show you how.
To add a custom domain to your site on GitLab Pages, navigate to your project’s Setting > Pages and click + New domain.
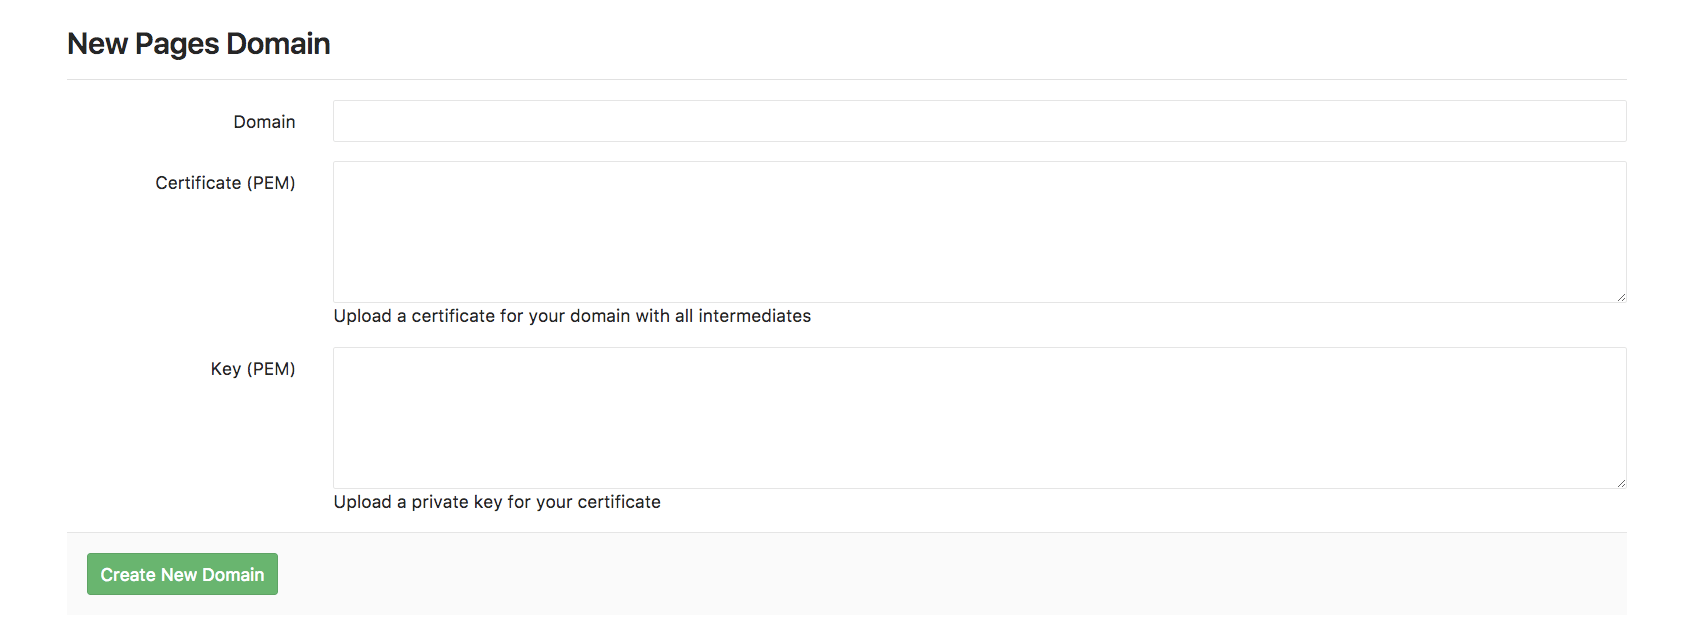
Add your custom domain name in the "Domain" field.
Leave the other certificate and key fields blank. You don't need to fill them right now.
After providing your custom domain name, you have to prove that you actually own it.
Go to your new custom domain's page if you aren't already there.
Copy the verification key by clicking on the icon on the right side of the "Verification status" field.
Then open a file on your computer, paste the key.
You'll need to split and trim it according to your registrar's platform in the next step.
Step 3 : Edit Your Domain's DNS Records
You just added your custom domain to your GitLab Pages, but it isn't enough yet.
Now, you need to tell your registrar that you want to assign your domain name to your site on GitLab Pages.
For that, you have to add a few DNS records to your domain name.
The records to be added depend on the part of your domain name to be used for your site.
As I already said, you can host your site under the root domain, the subdomain or both.
I recommend you, however, to start by hosting your site under a www subdomain and to add a redirection of your root domain to your www subdomain later on.
To successfully assign your subdomain to your site, you need to add a CNAME record via your DNS dashboard.
On Epik, I preferred going another way by setting up another type of DNS record : an A record.
It points your domain or subdomain to a specific IP address.
Here's how it looks like for freetiers.com :

As for the CNAME record, it points your subdomain, www.example.com for instance, to the default URL associated with your username username.gitlab.io .
name/host : www or www.mydomain.com

value : namespace.gitlab.io
When you're done, wait a few minutes before trying to access your site under its new URL.
In the meantime, let's point your root domain (example.com) to your www subdomain.
This will redirect anyone trying to access your site by typing your root domain (example.com) to your actual URL with the www prefix (www.example.com).
The same thing happens when you type google.com in your browser and land on www.google.com .
Depending on your registrar, the process varies a bit.
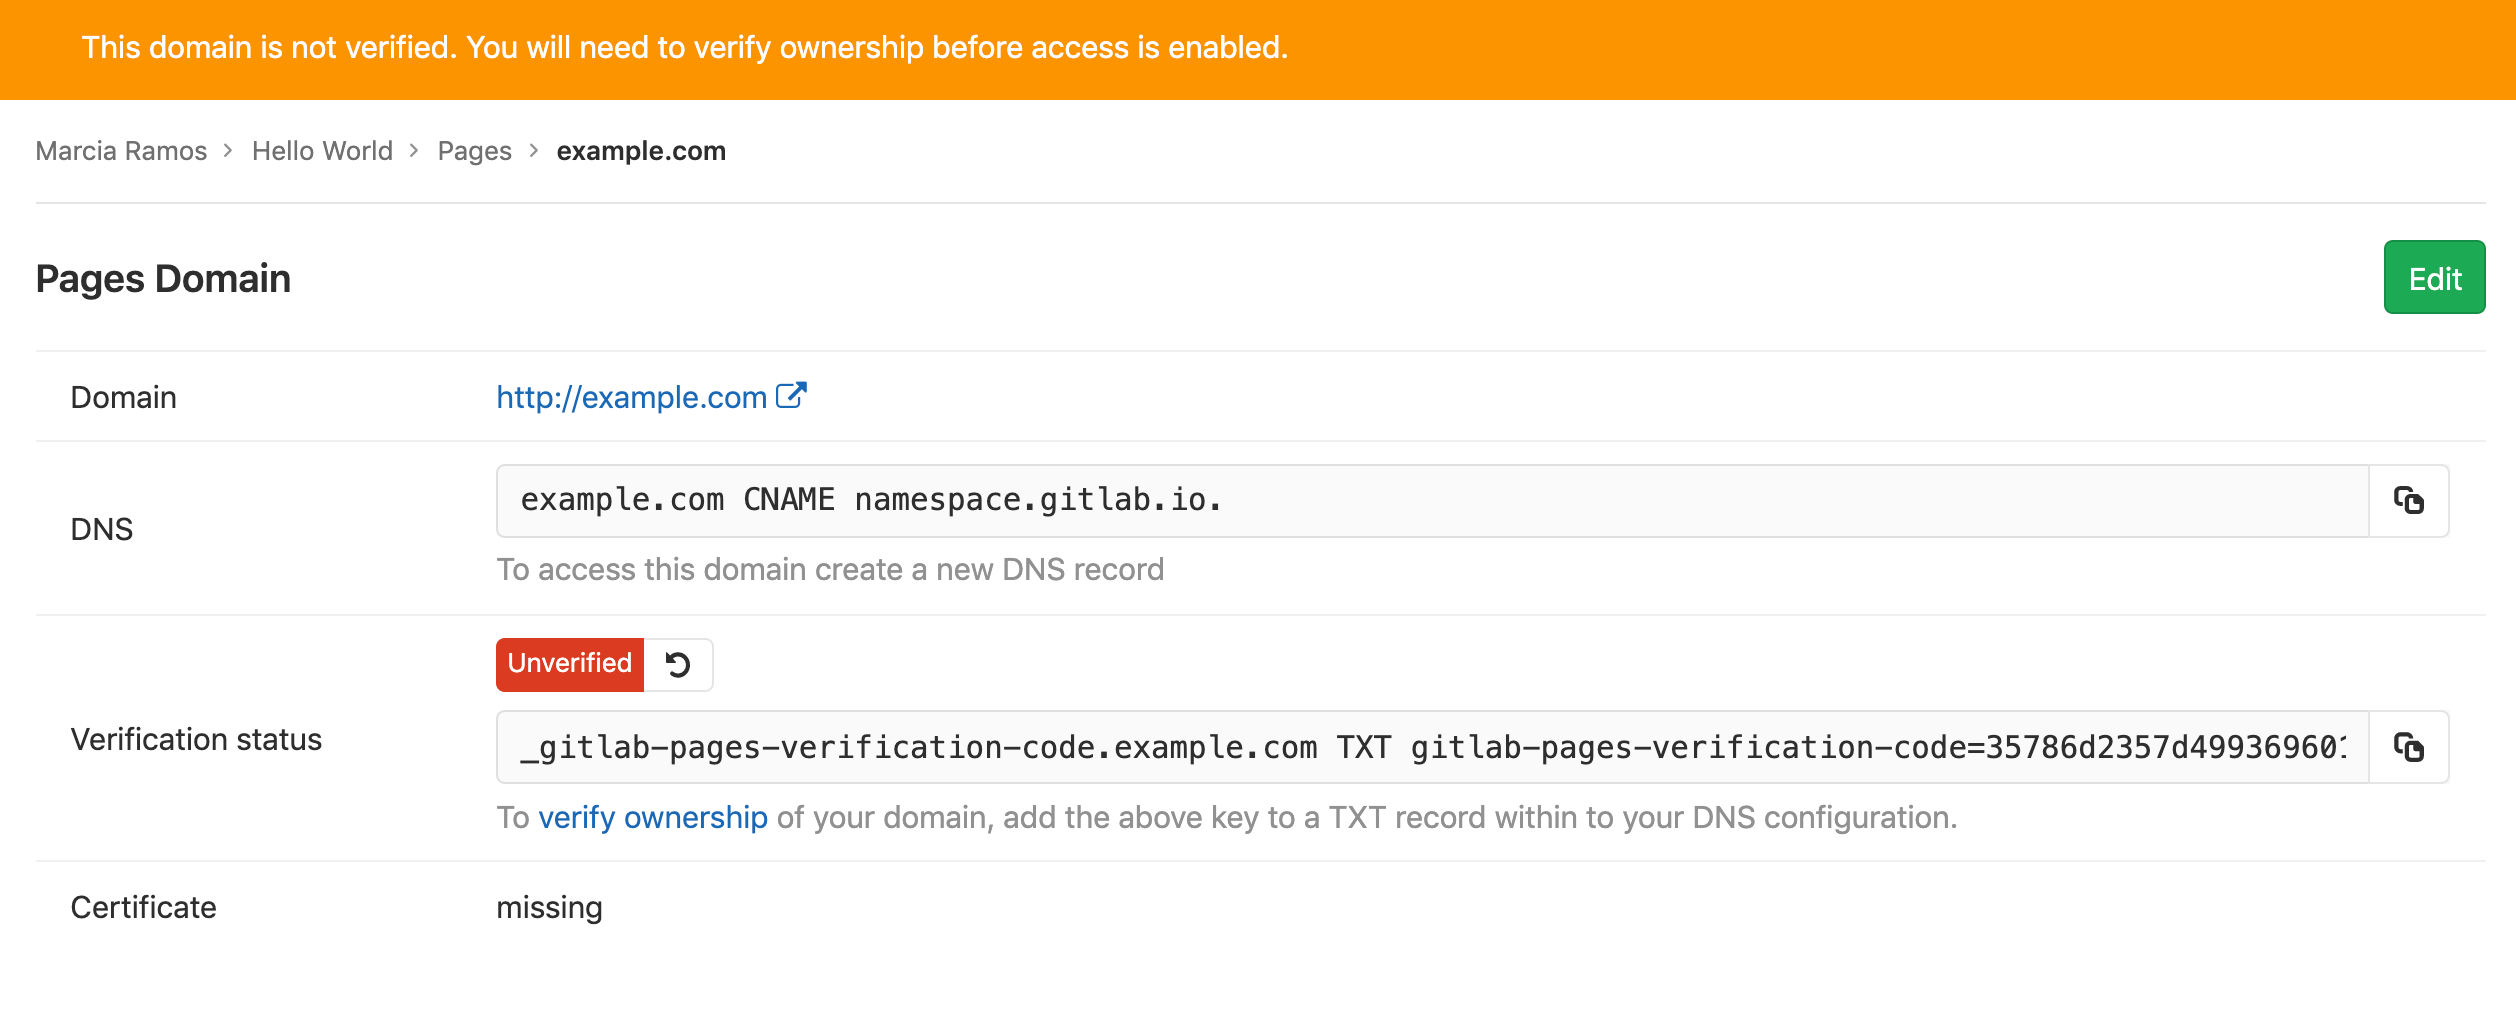
After setting up the redirection, you need to enter your custom domain verification key you saved earlier as a DNS TXT record.
Here are some links to guides on how to do it, depending on your registrar :
Here again, the process differs from one registrar to another.
Based on my own experience, you're more likely to verify your domain name successfully by proceeding the following way.
Here's an example of GitLab Pages verification code.
_gitlab-pages-verification-code.mysubdomain.mydomain.com TXT gitlab-pages-verification-code=00112233445566778899aabbccddeeffOpen the file where you saved your verification key earlier and follow along.
Split your verification code like this :
1- _gitlab-pages-verification-code.mysubdomain.mydomain.com

2- gitlab-pages-verification-code=00112233445566778899aabbccddeeff
From that point on, try to create a new DNS TXT record by entering the following set of values in the corresponding fields on your registrar's dashboard :
1st option :
host :  _gitlab-pages-verification-code.mysubdomain

TXT value : gitlab-pages-verification-code=00112233445566778899aabbccddeeff
2nd option
host :  mysubdomain

TXT value : gitlab-pages-verification-code=00112233445566778899aabbccddeeff
Step 4 : Verify Your Domain's Ownership
Now that you added all the required DNS records, go back to the verification page of your custom domain.
Click on the verification button as shown below.
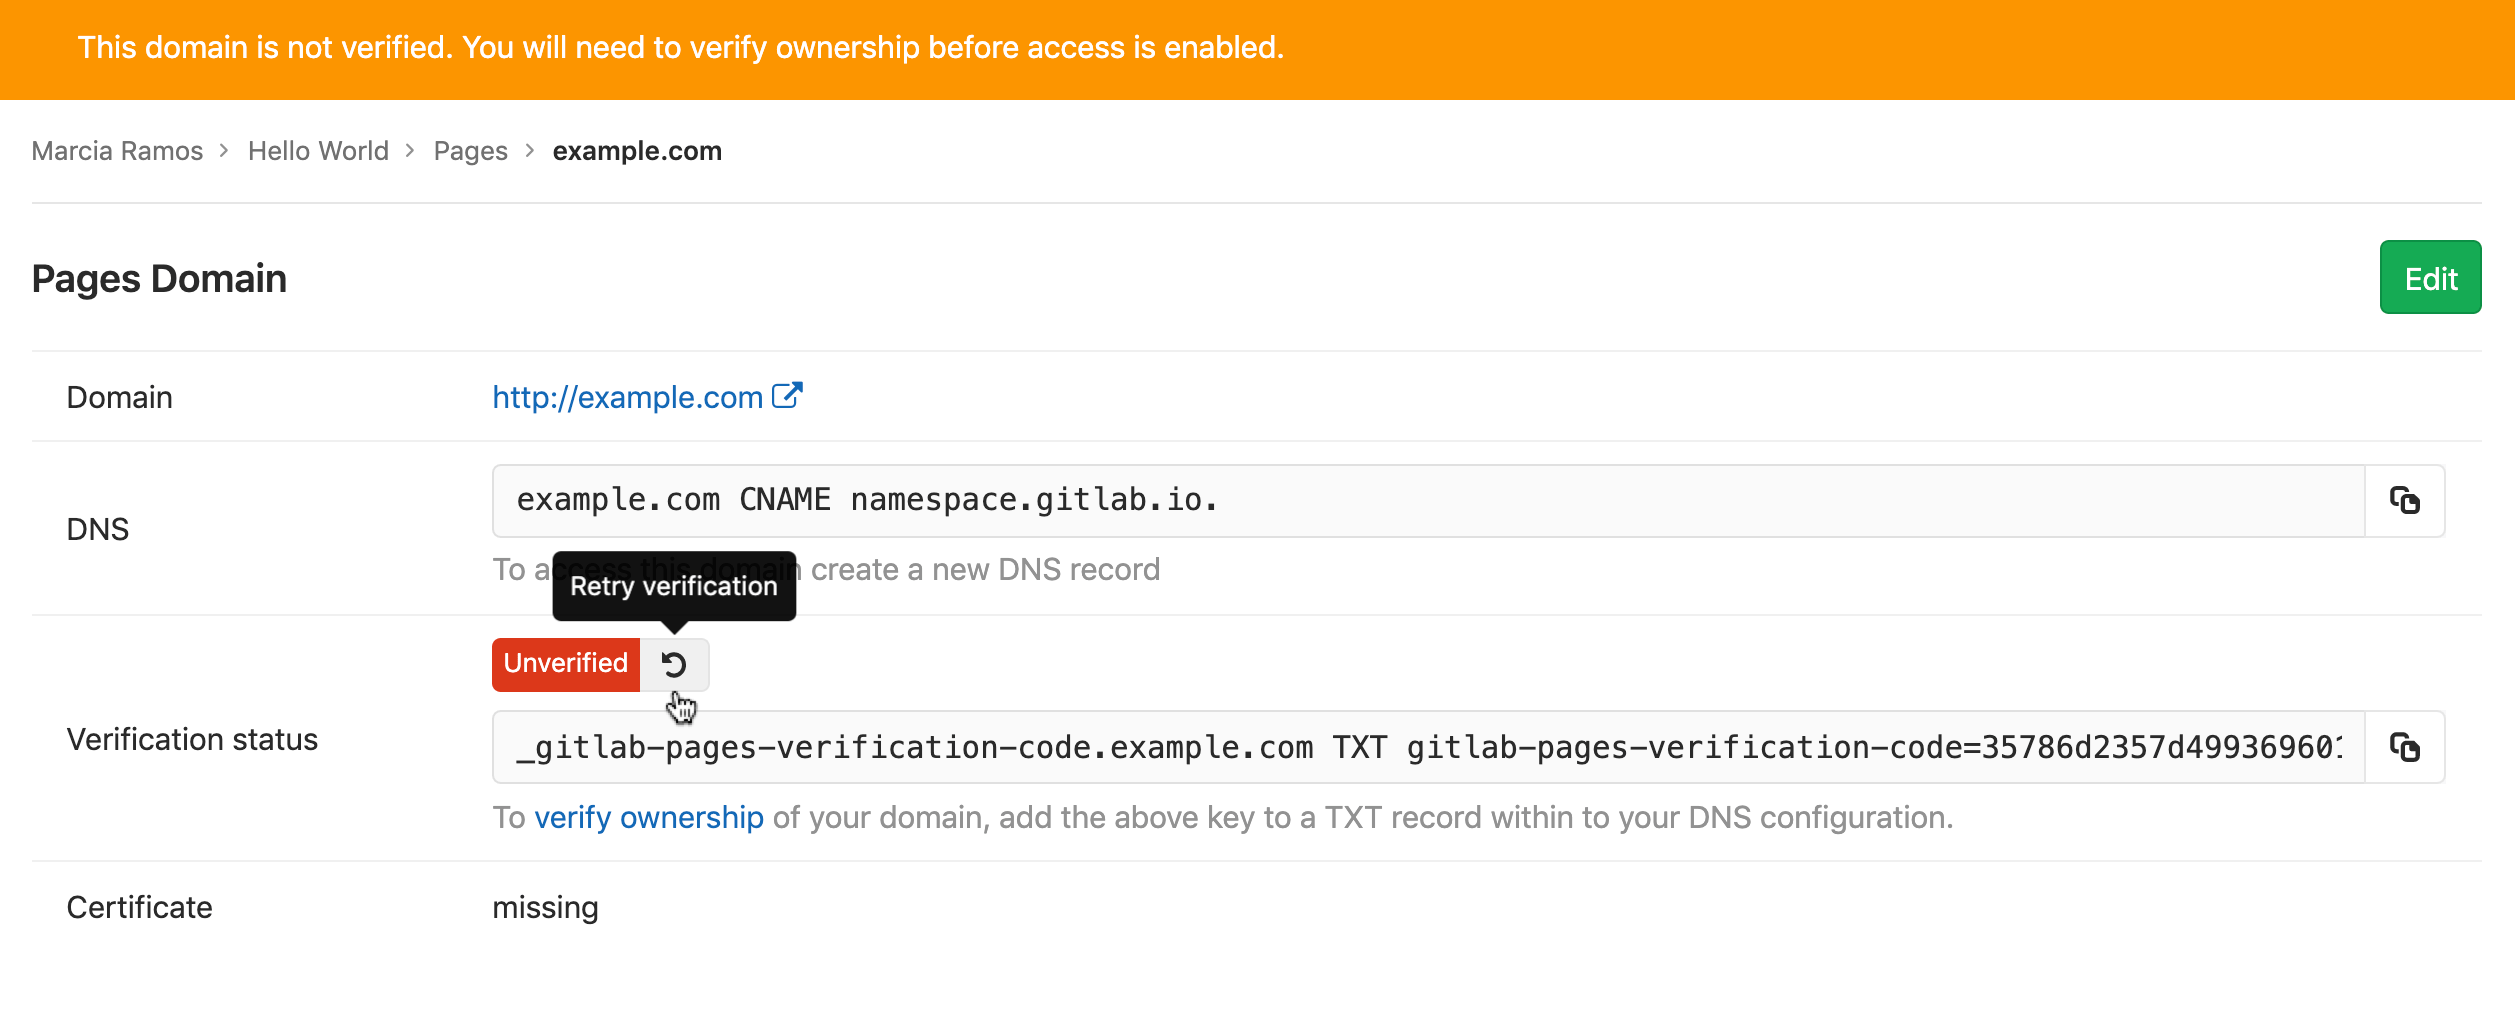
If the verification process succeeds, your domain's status will now be Verified with a green background.
Otherwise, try waiting a bit longer.
Sometimes, DNS records changes are slow to take effect.
If waiting doesn't solve the problem, make sure you split the verification key the right way.
Go back to your registrar's dashboard and check if you entered the verification key following the solution you picked in the previous step.
If you followed exactly a solution and, it didn't work out, try an alternative until it works fine.
I agree with you that this part of the process is rather tedious.
But a little patience will get you a premium grade, fast and secure hosting for free without any time limit.
Feel free to get in touch with me if you didn't manage to verify the ownership of your custom domain.
I'll be glad to help.
Step 5 : Generate an Access Token
Now that you put everything in place on GitLab Pages, you need to give your local Publii CMS a way to communicate with GitLab Pages.
The Publii CMS achieves that by providing a proof of your identity to GitLab first.
This proof of identity also specifies the permissions granted to the applications using them.
In the current case, this document will let Publii upload your site's files on your behalf every time you prompt it to do so.
This proof of identity is what we call an access token to be technically accurate.
Here's how to get a new one.
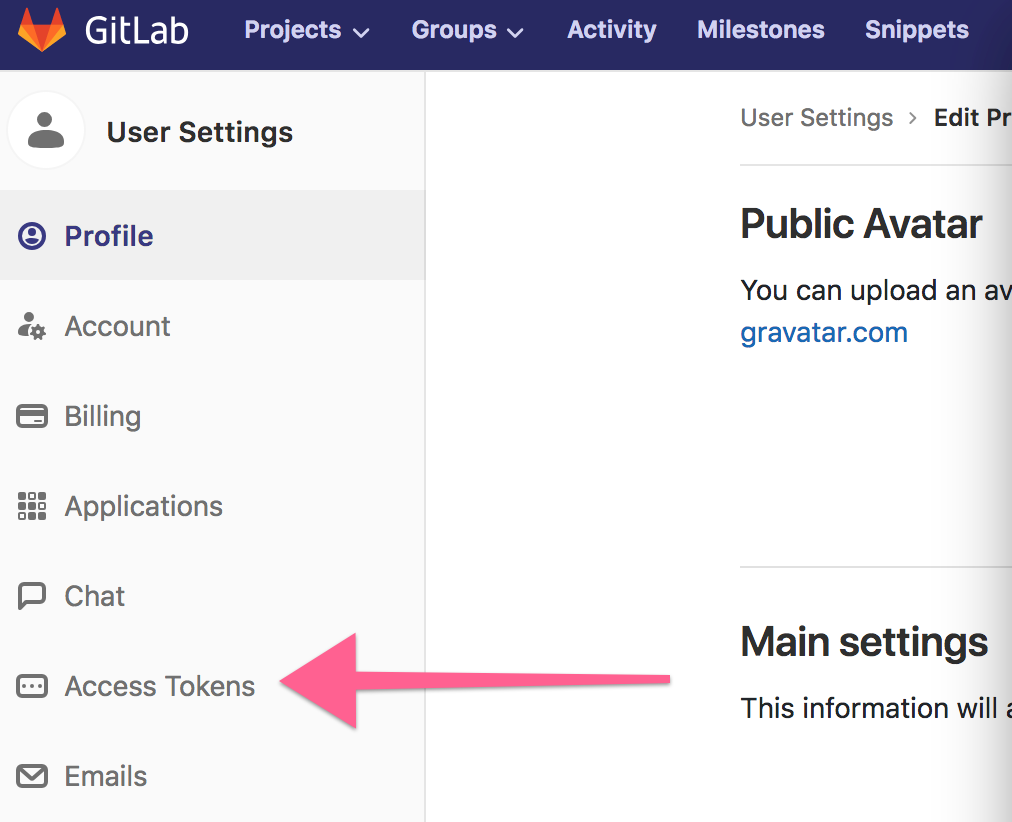
Start by going to your personal account's settings.
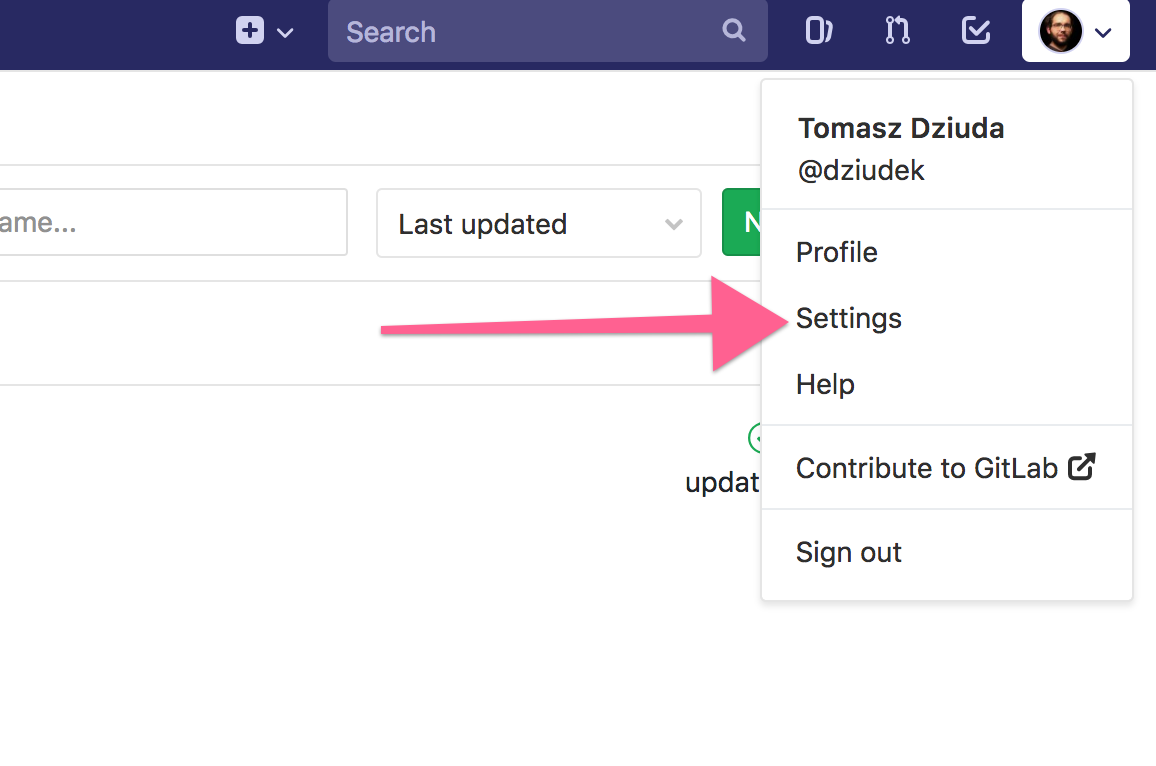
Next, select the Access Tokens section.
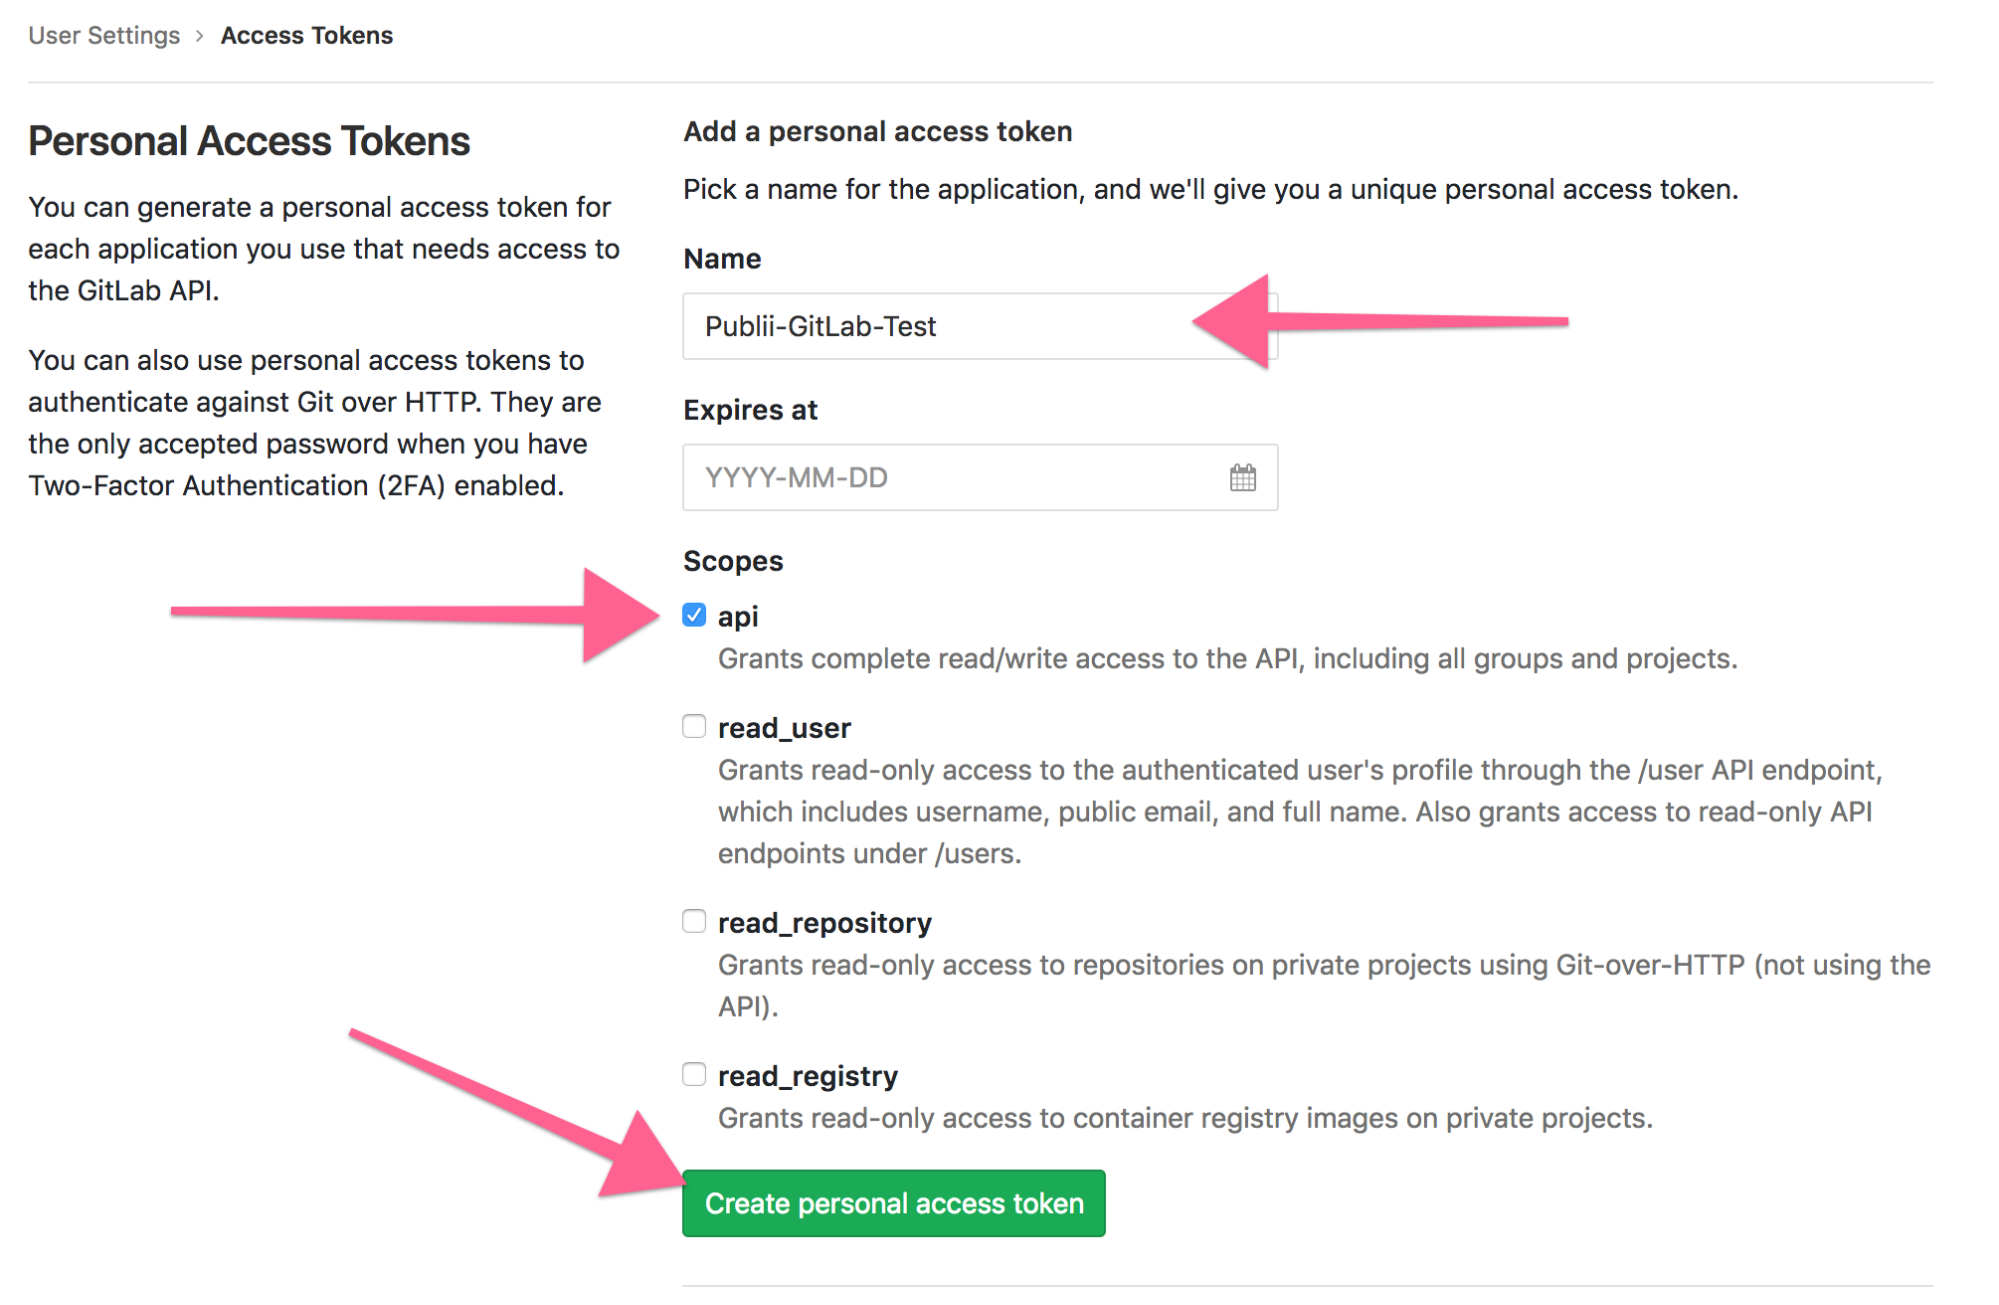
In the Access Tokens section, provide the name of your access token and the permissions granted (Scopes) to the application using it.
Publii needs to remotely access your projects on GitLab , so the access token to be generated must have an api scope.
Fill the form in the way shown below and click on the green button for creating the personal access token.
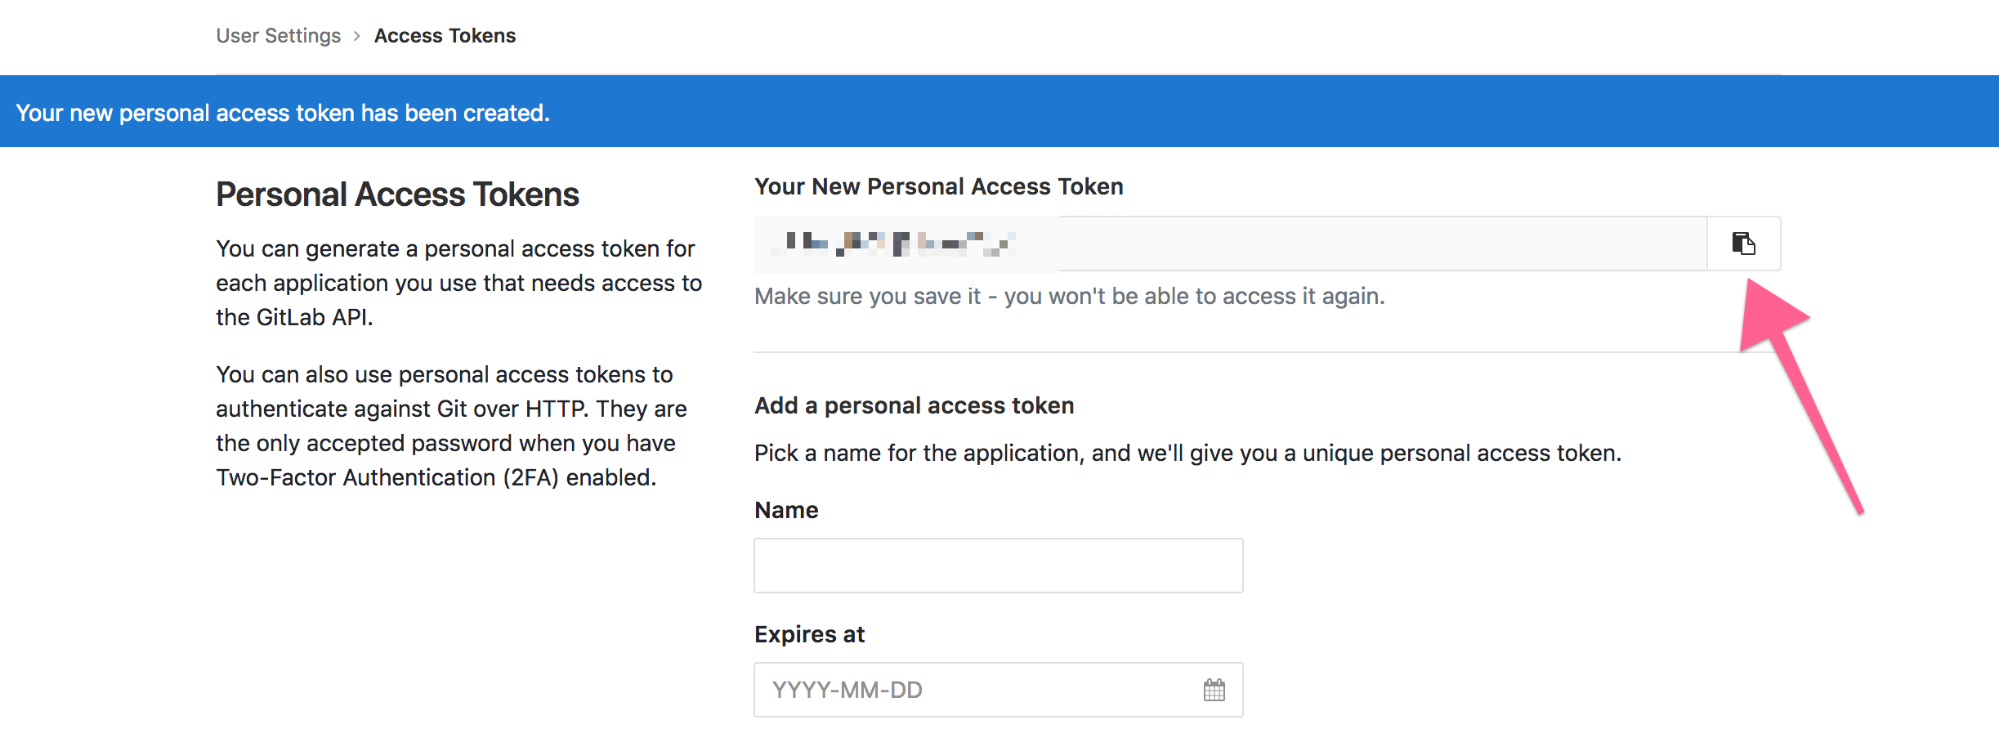
Your new token will be displayed.
Be sure copy the token and save it for later use.
There's no other way to access it after leaving this screen.
After saving your personal access token, go to the next step.
Step 6 : Set Up GitLab Pages as The Server in Publii
You have the proof of your identity and, you already set up your GitLab Pages project.
Let's feed those data to Publii to finally host your site for free on GitLab Pages.
First, open your Publii Desktop App.
Go to the server tab by clicking on the "Server" label in the sidebar menu.
You should get a screen looking like this :
Select GitLab as your server.
On the next screen, fill the form by providing :
- the access token you just created and saved in a file in the Token field;
- you custom domain name in the Domain field if you previously added one to your Gitlab Pages;
- the default address of your project in the Domain field if you don't have a custom domain name : it's usually in the form username.gitlab.io/projectname;
- the repository name which is the same as your project's name;
- the branch : master is the default branch;
As for the protocol and the server fields, they are normally filled out for you. Otherwise, be sure to fill them according to the image below.

Test your connection by hitting the test button.
If something goes wrong, check the values you entered to make sure you didn't make any typo.
Then save your settings.
Step 7 : Put Your Site Online
You're ready to put your site online.
Hit the "Sync your website" button in the lower left corner.
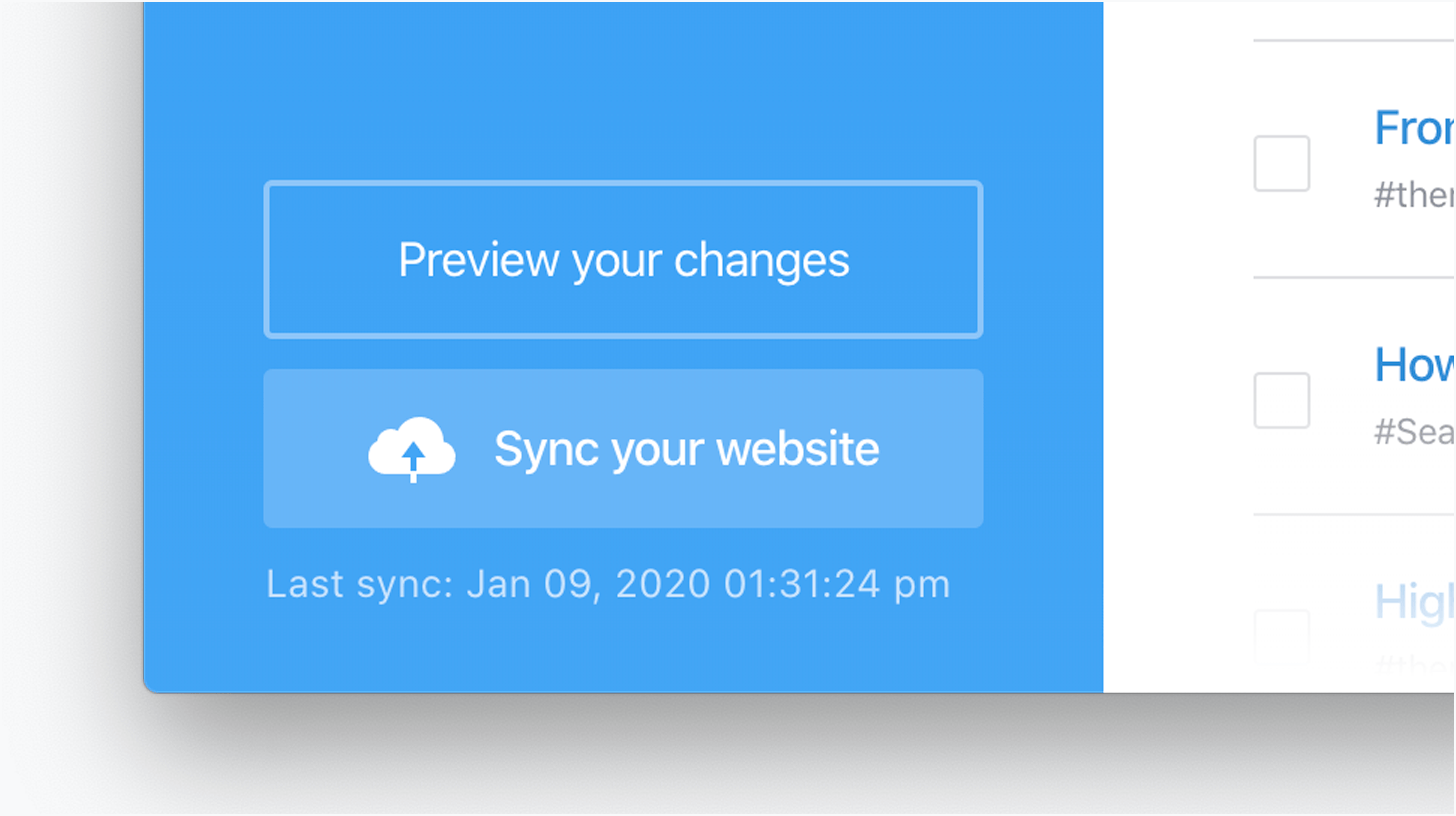
By the end of the website synchronization, Publii will generate your site's files and host them on GitLab.

Wait a few minutes before visiting your site at the URL you provided earlier.
Tips and Reminders
First, save your access token in a file for later use.
I already told you to do so, but it's very important.
Store this file securely to avoid losing it inadvertently.
If you don't have a custom domain yet, you can simplify your URL from username.gitlab.io/repository-name to username.gitlab.io by proceeding the following way :
- rename your project's repository following this pattern : username.gitlab.io
- replace username with your username.
The site hosted in that repository will then be available at username.gitlab.io .
You can also choose https instead of http as the prefix of your domain.
But you should wait until your ownership of your custom domain is fully verified before switching to https in Publii.
If you don't, your site risks being flagged as insecure and misconfigured, which will ultimately drive your visitors away.
Wrapping Up
We're at the end of this tutorial and by now, you should have your site properly hosted for free on GitLab Pages.
If for some reason it didn't work as expected, feel free to tell me about your concerns.
Just leave a comment if your concern might be shared by others. You can also directly get in touch with me for more personal inquiries.
Sources & Credits
Official Publii Docs For Gitlab Pages
Gitlab Documentation : Custom domain name


Comments